Happy Birthday Mom! And right now my Mom is thinking to herself......"my birthday was on March 4th......." Yes, I know, I know. I'm a little bit late......o.k.....I'm a lot bit late. I was well on my way to getting this done in mid-February but then life got in the way - sick dogs, new dogs, work, etc. But, it's the thought that counts, right? Better late than never, right? So Mom, this quilt is for you!
I used fabrics from the Teatime Floral Collection by Lakehouse. I LOOOOVE Lakehouse.....
 And, of course I made kits for you that you can find in the shop......
 And I apologize for the less than fantastic picture of the quilt. I was home alone and it's pretty hard to take a picture of a big quilt when you're by yourself! And I have no patience to just wait for John to get home and help me. So, I tried several different methods and ended up with a somewhat, almost, kind of acceptable photo. And I'm not going to tell you what I did to get that picture. I certainly didn't stand on the dining room table to get that picture! Only a crazy person would do that! Nope - definitely not standing on the dining room table.
And hmmm....I just realized something. I probably should have just said this was a Mother's Day Gift. That would have made a lot more sense. But I'm not gonna lie to you wonderful people! Instead, I'll probably be talking about Mother's Day gifts in August.
So again, Happy Late Birthday Mom! I hope you like your quilt!
Happy Sewing,
Jenny
P.S. It's called the Teatime Floral Circle Of Friends Quilt Kit
 Hello all you wonderful people out there in blog world! Remember when I told you that I still sew? That I do things other than talk about my pets? Well.....now I can prove it! I'm sooooo excited to finally be able to show you this project. I made this quilt for a friend of mine who's fighting Ovarian Cancer right now. And she's only 33 yrs young! Cancer is really getting on my last nerve these days! (Take a peek at this post if you don't know why I'm so annoyed with stupid cancer!) Anyway, I came up with the idea to send a square of white fabric to each of Jami's family and friends, have them draw a picture with crayons and then I sewed it into a quilt.
 The response was amazing! I ended up with about 75 squares so I was able to make a HUGE quilt. And I'm seriously stunned by what people were able to do with crayons. Look at these - they're amazing!
 And this gorgeous painted pony.....
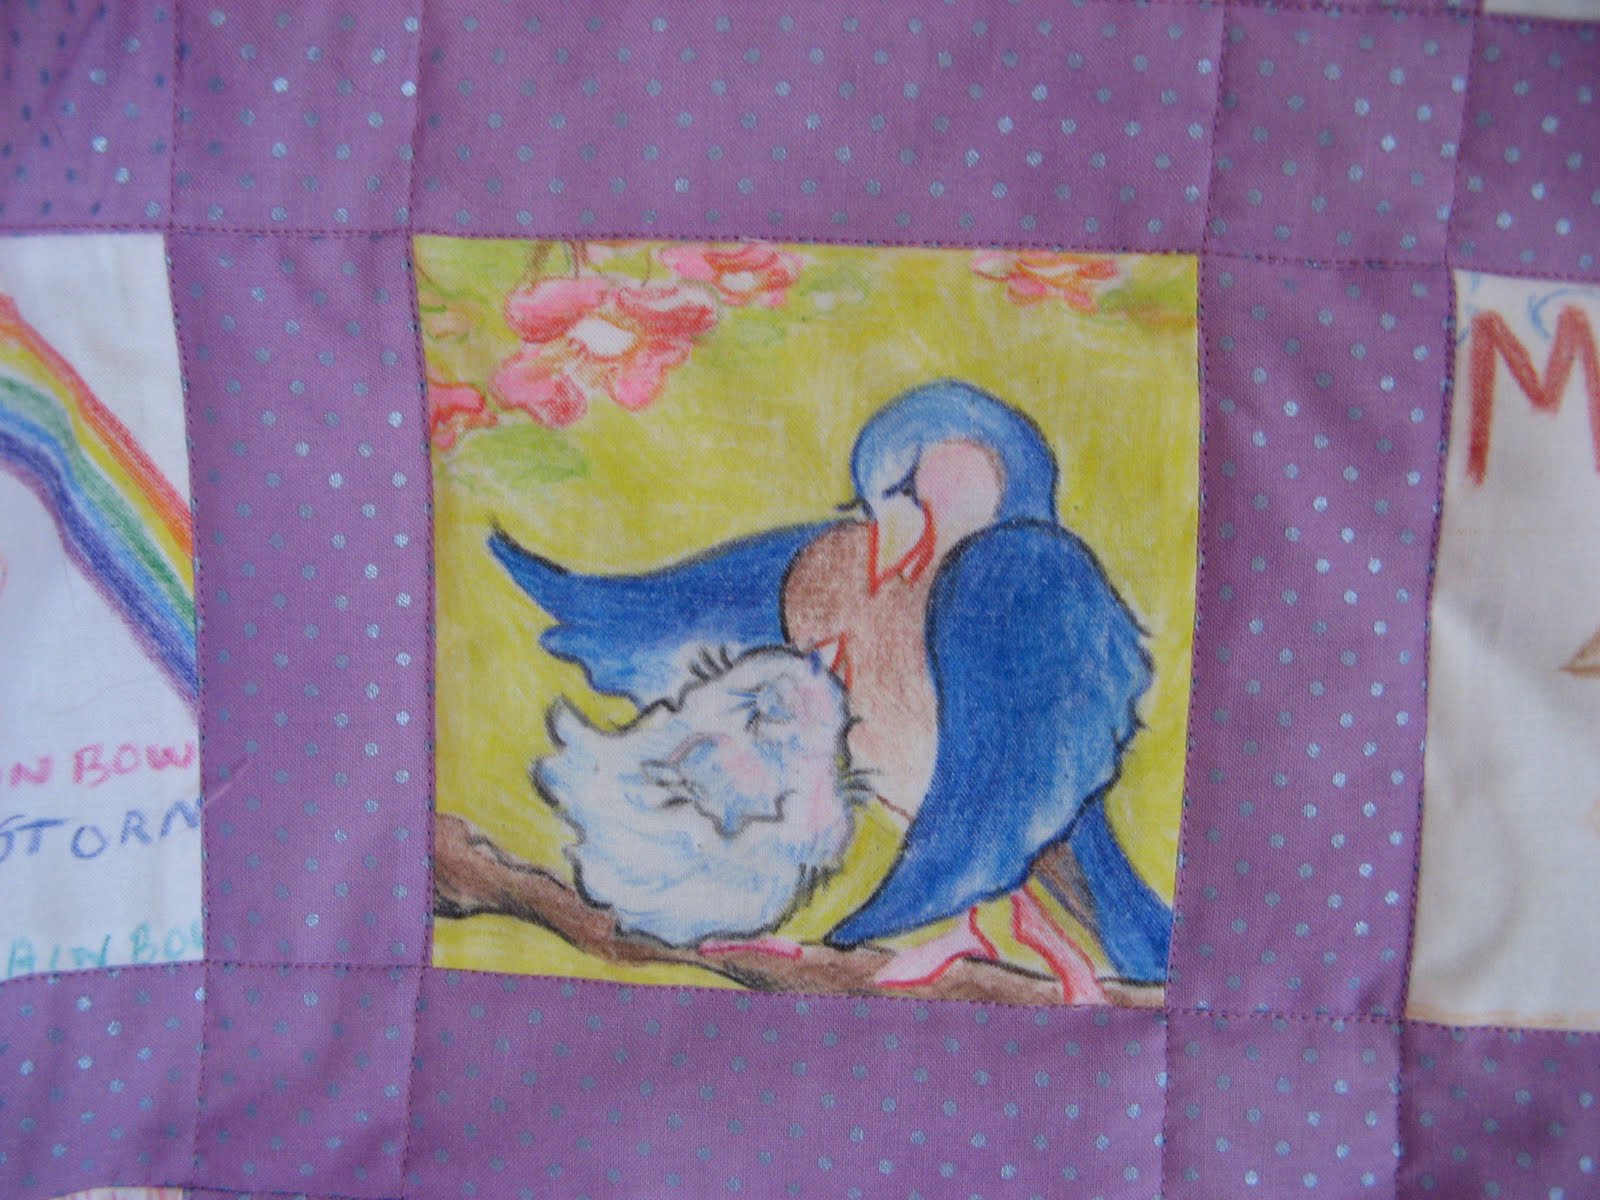
 And this sweet mama and baby bird.....
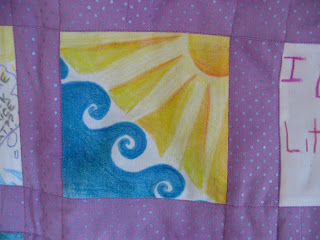
 And this beautiful ocean scene was done by a very talented 14 yr old....
 And this adorable dog was done by a part-time artist.....
 Oh, and please know that my sewing isn't that crooked! Some weird camera angles and the way the quilt was draped made the squares look so wonky. Seriously. My seams were perfectly straight. Well.....maybe not perfectly straight.....but a lot straighter than they look in the close-up photos!
You'll see that I did a very simple, plain border. I had plans for a much fancier border. But, honestly, I just ran out of time. A few people were....hmmm.....shall we say a little late getting their squares back to me. And Jami's almost done with chemo and I obviously wanted to give her the quilt while she was still in the hospital. So a simple border was my only option.
And if you're wondering - Jami loves her quilt. I think it really showed her how many people she has who are cheering for her through this fight.
I also think this type of quilt would be a great idea for a new baby or a wedding or an anniversary or a landmark birthday. So, if you're interested in making one here's how I did it.....
-I used Moda Bella Solids Bleached White as my fabric. You'll get 24 squares out of each half yard of fabric. And I highly recommend you get twice as much fabric as you think you'll need. Hmmm.....some people might want a practice square......or two.....or three. I cut about 150 squares.....and about 75 made it back to me!
-While working in sections about the size of a fat quarter I ironed freezer paper to the fabric. Use a hot iron, no steam and apply the rough side of the freezer paper to the fabric. This temporarily adheres the paper to the fabric. The freezer paper makes it sooooo much easier to color with crayons on the fabric.
-Cut the fabric/paper into 5" squares. Lots and lots and lots of 5" squares.....
 -Tell everyone to color a picture using plain old Crayola Crayons. No special fabric crayons needed. And give everyone a deadline. And make sure that deadline is actually two weeks before you really, truly want the squares back!
-Now you have to heat set the crayon into the fabric. Remove the freezer paper if it hasn't already fallen off. A lot of the squares lost their freezer paper while they were being colored on. Place the square crayon side up on the ugly ironing board cover......
 (And yes, that's a margarita. Every quilt needs a margarita with a slice of lime!)
-Place a paper towel on top of the fabric crayon masterpiece. The paper towel will protect your iron and it will also help you know when the crayon is fully set (more on that in a moment!). Now, using a hot iron with no steam you will do your heat setting. Place the iron on the paper towel for about 15 seconds. Then, lift up the paper towel and you'll probably see a little bit of color has transferred to the paper towel. Move to a fresh section of paper towel and iron again. Keep doing this until no color is transferred to the paper towel. It took two passes for most of my squares. Some of the ones with a lot of dark, saturated colors took 3 passes.
 -Then I cut 1 1/2" sashing strips and put the quilt together. I also used the 1 1/2" sashing strips as my border. Again, I wish I would have had more time to make a fancier, prettier border. It took about 2 yds of fabric for the sashing, border and binding. And it took about 3 1/2 yds for the backing. Obviously, those fabric requirements are for a quilt that's about the same size as mine!
O.K. I think that's everything. Let me know if you have any questions about this! I'm gonna get back to sewing now so I can continue to prove to you that I still make things!
Happy Sewing,
Jenny
 Hey there......it's me......Emma Jane......and....."what's her name." Yup - it looks like she's here to stay. Everyone thought I was being so cool about the new puppy in the house. At the time, I didn't realize she was staying! I just thought she was some distant cousin here for a weekend visit. Ugh. My peaceful home has been turned upside down. I'm thinking about packing my bags and heading to Grandma's for a while. So, obviously I picked the Doggie Bag Pattern as my pick this week......
 It's cute and stylish enough for a little fashionista like me. And it looks like it will hold plenty of my dog toys and food. And there's even a little dog tag attached to the ribbon collar on the applique doggie.
Well.....I'm gonna go try and deal with my new reality. Wish me luck. I'm gonna need it!
XOXO,
Emma Jane
 Happy April! This month we're giving away a Pink & Brown Fat Quarter Bundle from the Hushabye Collection by Tula Pink for Moda. I thought the Bunny Damask would be perfect for April and.....well....if you look at my logo colors you'll see that I love pink and brown together! And if you look here you'll also see how much I love bunnies!
Just send us an e-mail with the word Bunny in the subject or text and you'll be entered to win. We'll also sign you up for our newsletter (if you're not already on it) unless you write No Newsletter in your e-mail. The last day to enter is April 30, 2010. (PLEASE NOTE: Deadline has been extended to May 9, 2010). Please feel free to leave a comment (I Love to read them!) but be sure to send an e-mail to be officially entered.
Good Luck and Happy Sewing,
Jenny
May 10, 2010 Update: The winner of the April Giveaway is Kim F. of Arlington, Texas. Congratulations Kim!
P.S. You can read about last months Darla Green Bundle Giveaway here. The winner is Diane I. from West Union Iowa. Congratulations Diane! And thanks to everyone for entering and for all your nice comments!